Database Targets
One of the more powerful features that WebSentinel offers is the ability to store all data associated with a user or group in an external database apart from WebSentinel itself. There are many reasons to use this flexible storage capability, depending on your needs. For instance, if you have a large user listing which has outgrown the capabilities of WebSentinel's Built-in database, you may wish to utilize a different database such as Verona. Or perhaps you have an existing FileMaker Pro database that contains registered users for your web site and you don't want to duplicate effort. You can even have multiple storage targets active at the same time on a single copy of WebSentinel, with each target holding user information for different realms.
This chapter will help you fully understand how to use database targets with WebSentinel, and will lead you through the installation of the Verona target and database server which is included with the WebSentinel package.
How Targets Work
Each realm defined in WebSentinel must have an associated target to store its users and
groups data. There is no set limit to the number of targets that may be defined and active
simultaneously on your site.
In WebSentinel Admin, a listing of all the currently defined and active targets
appear in the Administration palette. Using WebSentinel Admin's interface, you can work
with multiple sets of users and groups across targets at the same time. This capability
allows you to move users from one target to another with the simplicity of drag and drop.
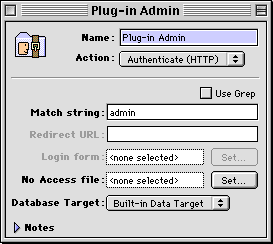
By default, when you define a new realm it is set to the first target available, usually WebSentinel's Built-in Data Target. The Built-in target is a simple database withy both strengths and limits. It can hold a very large number of users without any extra memory requirements on the server, but after your site's user base has grown into the many thousands you will notice that thetask of administration users will slow. Each of the realms pre-defined when you installed WebSentinel utilize the Built-in target, as the detail window for the "Plug-in Administration" realm shown below indicates.

Figure 6.1: Realm which uses the "Built-in Data Target" target.
To change the target for a realm, select the new target you wish to use in the pop-up menu and close the realm detail window.
Installing a New Target Plug-in
This chapter uses the Verona database target as an example, which is pre-installed
by the WebSentinel package. However, if you wish to use a different database target you will
need to first install it prior to use. WebSentinel database targets are implemented as plug-ins to Websentinel itself, similar to how WebSentinel is a plug-in for you web server software. To install a new database target, simply move it to the "Data Targets" folder of the "WebSentinel Data" folder, which is located in your web server's plug-ins folder. Be sure to read any documentation included with the new database target you are adding to ensure proper installation!

Figure 6.2: Database target plug-ins default folder contents.
After installing any new plug-ins you will need to quit and restart the active web server and WebSentinel Admin so they will be loaded and available for use.
Creating a New Target
Now that we have defined what a target is we'll walk through what is necessary to
create a new target that uses Purity Software's web database application, Verona. A fully
functional version of Verona that is limited to serving only a few database tables is included
with WebSentinel, so you can store large numbers of users (into the ten thousands) with
the standard package. If you own the full version of Verona, it may be used in place of the
limited version included with WebSentinel to bypass the database limit. (Note that WebSentinel requires version 1.0.5 of later of Verona, and will not function properly with earlier versions.)
First, launch WebSentinel Admin and connect to your web server. Once you are connected, open the Preferences panel, either by choosing "Preferences" from the Edit menu or clicking on the Preferences icon on the Administration palette. Among other settings shown in the panel, a listing of currently defined targets is shown. If you have never modified your targets before, there should be only one listing for the Built-in database named "Built-in Data Target".

Figure 6.3: WebSentinel's Preferences panel with default targets listing.
To create a new target, click on the "Add" button to the right of the targets listing. A dialog showing a list of available target types is shown, choose the listing for "Verona" and click on the "OK" button to proceed.
![]() If you do not see a listing for the database type you wish to use it may not have
been installed correctly. See the Installing a New Target Plug-in
section earlier in this chapter or reference the Troubleshooting
chapter for assistance.
If you do not see a listing for the database type you wish to use it may not have
been installed correctly. See the Installing a New Target Plug-in
section earlier in this chapter or reference the Troubleshooting
chapter for assistance.

Figure 6.4: Choosing a database type for use as a new target.
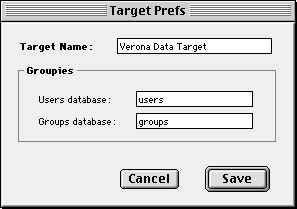
After choosing the database type of our new target, a Target Preferences panel will be presented allowing you to customize how the new target will be used. Each database target has its own unique preferences so if you are configuring a target other than Verona your screen may differ from the one shown below.

Figure 6.5: Setting preferences for our new target.
The Preferences panel allows you to customize the name of the new target as well as the names of the databases that Verona will use to save all users and groups info. For the purposes of this example, we will name the new target "Verona Data Target" to be consistent with the built-in target's name and set the database names to "Web Site Users" and "Web Site Groups". After making any changes click on the "Save" button to continue.
The WebSentinel Preferences panel should now include a listing for your new target which indicates that it was successfully defined and is ready for use. Click the "Save" button when you are done.
Using Your New Target
If you successfully completed the above section, the Administration palette now shows a
new listing for the new "Verona Data Target" target when you click either the users or groups icon. Before you can begin adding users to
the new Verona target, be sure that Verona is running on your web server.
![]() If you plan to
use Verona for data storage on your web server, make an alias to the application in the
Finder and put it in the "Startup Items" folder within the "System Folder". This will
ensure that Verona is launched each time your server restarts.
If you plan to
use Verona for data storage on your web server, make an alias to the application in the
Finder and put it in the "Startup Items" folder within the "System Folder". This will
ensure that Verona is launched each time your server restarts.
Open the Verona users window by double-clicking on the Users icon for your new Verona target or by choosing it from the Windows menu. Since this is the first time using the new target, there will be a slight delay as Verona creates a new database on your web server to store user information. Opening the Verona groups window for the first time will also create a new database to store group information.
Now that we have created the Verona target, let's define a new realm that uses it. For the purposes of our example, we'll create a realm that protects a section of the site available only to registered subscribers. First open the Realms window if it is not already by clicking on its icon in the Administration palette or from the Windows menu. Then choose "New Realm" from the File menu, and enter all necessary parameters in its detail window. Since we don't want to use WebSentinel's built-in storage, choose the "Verona Data Target" item from the Database Target pop-up menu instead.

Figure 6.6: New realm using the "Verona Data Target" target.
After closing the realm detail window, you have completed all the steps necessary to define a new realm using the Verona database engine for storage needs. All administration capabilities offered by WebSentinel with the new database target and realm are no different than using the Built-in target. To copy users from one target to another, simply open the Users window for each and drag the user from one to the other. Note that copying a large set of users from one target to another may take some time depending on what targets are being used.
This concludes the Database Targets chapter, after reading it you have learned all the necessary components of using multiple storage mechanisms for the security on your web site.
Finding Other Target Plug-ins
If you are looking for a specific target plug-in, be sure to visit the
Purity Software web site for information on what
plug-ins are currently available.
If you are a developer and would like to create a custom plug-in for your security storage needs, an API is available free of charge from the Purity Software web site. For assistance in developing a new WebSentinel plug-in send e-mail to websentinel-support@purity.com.